What’s your strengths and weakness of your latest Google Ads campaign? Without this essential information, it’s impossible to find out which strategy works for your brand.
Website owners face challenges when tracking their Google Ads campaigns, which can lower their ability to optimize their marketing and make money.
This article will show you how to add GCLID to Google Analytics and give you instructions on how to solve this pain point and get valuable insights into your website’s performance.

What’s GCLID?
The GCLID, or Google Click Identifier, is an essential component for tracking your Google Ads campaigns. By using the GCLID, you can collect information and understand the behavior of people who visit your website by clicking on your ad. The GCLID is located as a long slice of code behind your URL. In fact, the click identifier doesn’t exist only at Google. There are also Facebook, Microsoft, and other versions of it—known as FBCLID and MSCLID, etc.
To capture the GCLID in Google Analytics, you need to take some actions. In this article, we’ll talk about how to add Google Click ID (GCLID) to Google Analytics. You also have to enable GCLID tracking in your Google Ads Account.
How to add Google Click ID (GCLID) to Google Analytics 4
Create new custom definition on Google Analytics 4
Our first step is to get Google Analytics 4 ready to collect GCLID data. We’ll need a new “custom definition” for this. You can get Google Analytics 4 ready to collect GCLID data by following the steps below.
- Visit Google Analytics home page.
- Navigate to your “Configure” page by clicking the button
on the left panel.
- Click “Custom Definitions”.
- Click “+ Create Custom Dimensions” button.
- Select “Event” for scope and type “GCLID” for Event parameter.
- Name your dimension as “Google Click ID”.
- Click the “Save” button to create your new custom dimension.

Create new variable on Google Tag Manager (GTM) to capture GCLID from URL
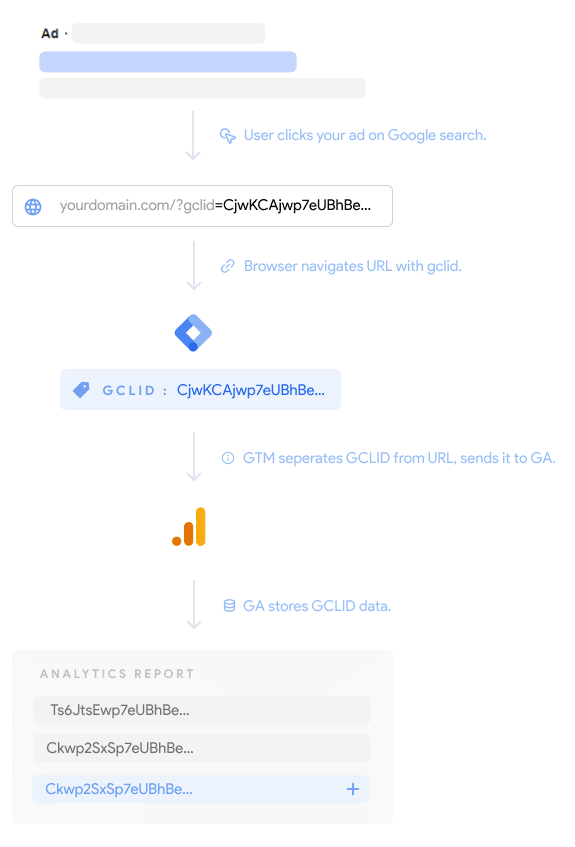
When a user clicks on your ad, Google adds a GCLID to the end of the URL. Unfortunately, Google Analytics doesn’t collect this information by default. We need to somehow separate the GCLID from the URL and send it to Google Analytics. For this, we need the Google Tag Manager. With a variable that we’ll create in Google Tag Manager, we can easily do this and send the GCLID to Google Analytics for storage.
- Go to Google Tag Manager.
- Navigate to the “Variables” page by clicking the “Variables” button in the left sidebar.
- Click the “New” button on the User-Defined Variables panel.
- Click the “Variable Configuration” panel to configure your new variable.
- Choose “URL” for variable type.
- Choose “Query” for component type.
- Type “gclid” for query key.
- Name your variable as you wish and click “Save” button in the top right corner.

After following the steps above, Google Tag Manager will be able to separate GCLID from URL to store it in variable. Now all we have to do is send this variable to Google Analytics on user visits.
Create new tag on Google Tag Manager to send GCLID to Google Analytics 4
In the previous steps, we separated the GCLID from the URL and stored it as a variable. However, this variable is still only available in Google Tag Manager, not in Google Analytics. In this step, we add a new tag to Google Tag Manager to send this variable to Google Analytics.
If you don’t have an Analytics Tag that you use to send your data to Google Analytics 4
- Navigate to the “Tags” page by clicking the “Tags” button in the left sidebar.
- Click the “New” tab in the Tags panel to create a new tag.
- Click the “Tag Configuration” panel to configure your new tag.
- Select “Google Analytics: GA4 Configuration” as the tag type.
- Type the “Measurement ID” in the Tag Configuration panel. (Don’t know how to get Measurement ID? Visit the support page to learn.)
- Click the “Fields to set” and then click “Add Row”.
- For “Field Name”, type the “GCLID” which is the user property of the custom definition you created earlier.
- For “Value”, click the plus button and choose the GTM variable you created for GCLID in the previous steps.
- Click the “Triggering” panel to adjust trigger for this tag.
- Select “All Pages”
- Name the new tag as you wish and click “Save” to save it.

If you already have an Analytics Tag that you use to send your data to Google Analytics 4
- Navigate to the “Tags” page by clicking the “Tags” button in the left sidebar.
- Click on your existing “Google Analytics: GA4 Configuration” tag to configure it.
- Click the “Tag Configuration” panel to edit your Tag Configuration.
- Click the “Fields to set” and then click “Add Row”.
- For “Field Name”, type the “GCLID” which is the user property of the custom definition you created earlier.
- For “Value”, click the plus button and choose the GTM variable you created for GCLID in the previous steps.
- Click the “Save” to save changes on the Tag.
You’re all set
After the completing steps above, you’ll be able to see GCLID on Google Analytics reports. If you want to access this data programmatically, please also have a look at our post about using the GA4 Reporting API to fetch GCLID data. Using the GCLID for Offline Conversion imports to your Google Ads Account might be an interesting next action for you.
Note that, GCLIDs won’t be retroactively added to your old reports. You can see how the whole process works as presented below.
Also remember to check GA4 event collection limits for the most up-to-date Google documentation.


